How to Analyze Your Golf Swing with AI: A Practical Guide
Quick answer
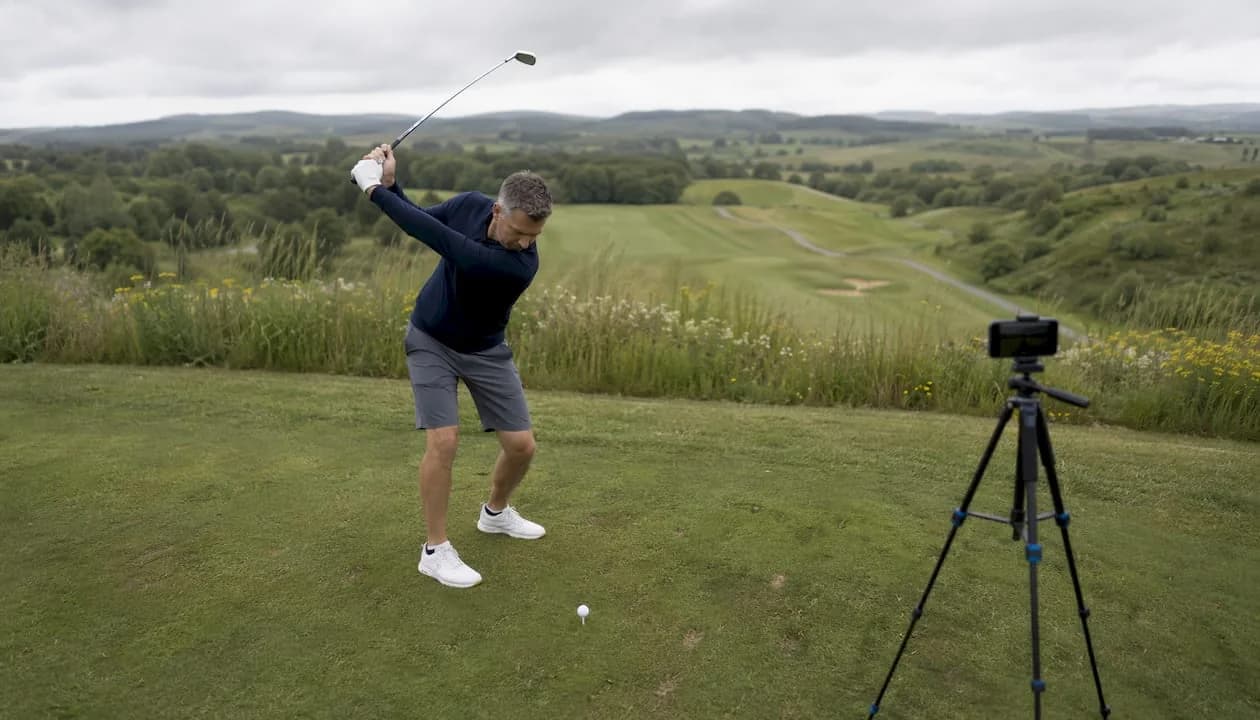
Record one clean swing video, upload it, and spend your next practice session on the single fault the report names as the root cause. Two angles give the analysis more to work with, and one is enough to start. The rest of this guide is detail in service of that loop.
- Record down-the-line (camera behind the ball, looking down your target line) or face-on (camera facing your chest at address). Both is better than either.
- Upload it. Your first analysis on AI Golf School is free and finishes in a few minutes.
- Read the report for the fault it names as the primary cause, not the one with the scariest severity number.
- Pick one drill tied to that cause. One, not three.
- Refilm the same angle after a focused practice block and compare the severity on that fault.
How AI swing analysis actually works
It starts with pose estimation. Computer-vision models find your joints in every frame of the video and track them through the swing. From those points the system calculates joint angles, spine tilt, how far your shoulders and hips have turned, and where the club travels through the hitting zone. Then it looks at the order things happen in the downswing. Sequence is where most power leaks hide, and none of it is visible at full speed.
AI Golf School splits that job across two systems. The Oracle is the physics engine: it tracks your body and club in 3D through impact and produces measurements like club path, tempo, weight shift, X-factor and pressure shift. Caddie Vision is the coaching layer on top, and it only gets to talk about what the Oracle measured. Six computer-vision models are fused per swing, and the system was built against a training set of more than 10,000 analyzed swings. The full breakdown of how that pipeline works goes into more detail.
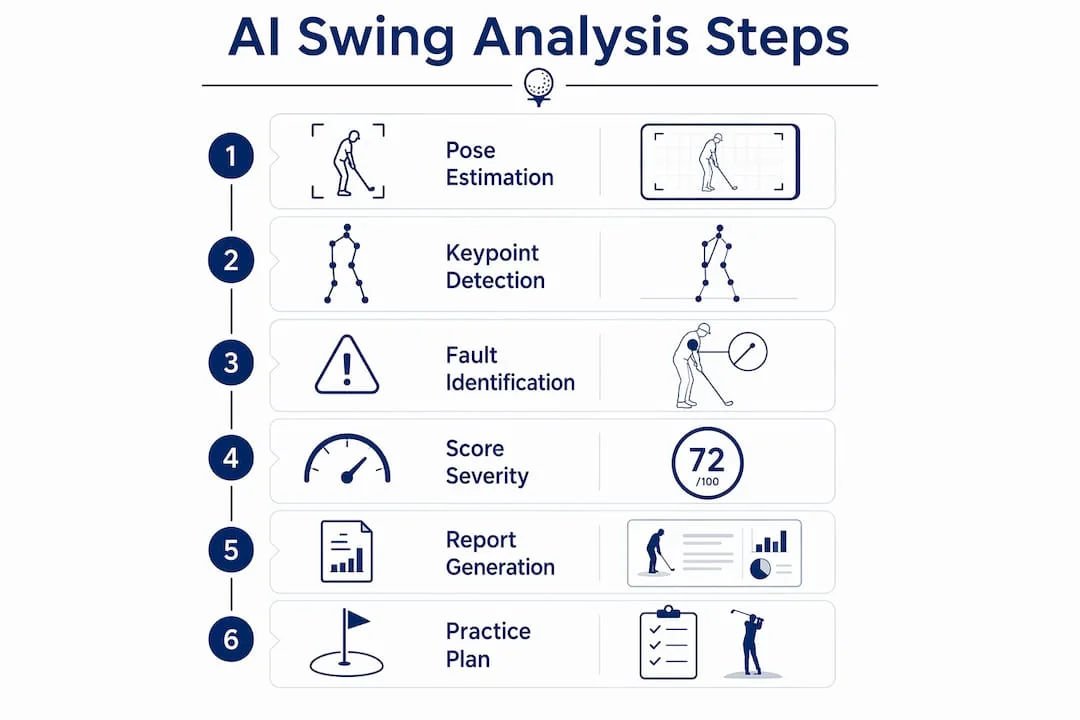
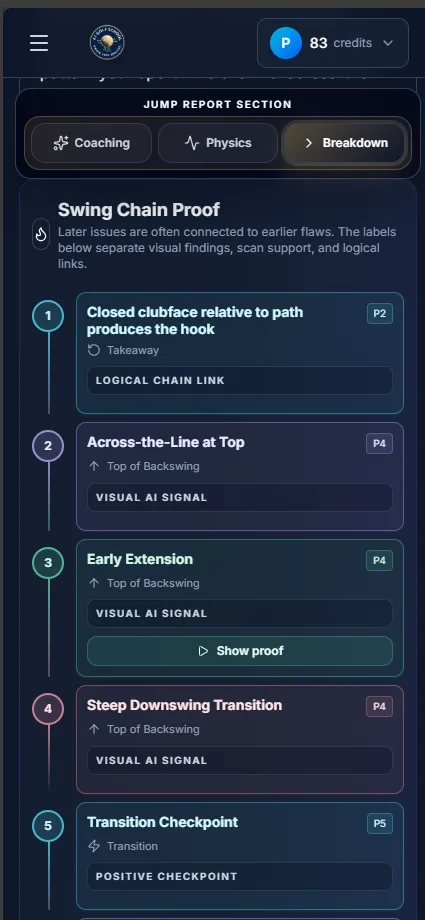
What comes back is a short list of named faults rather than a wall of numbers. A normal imperfect swing usually produces two to four of them, each with a severity rating, and one gets marked as the primary cause. That last part matters more than it sounds. The primary cause is not automatically the highest severity number, because the highest number is often a compensation for something that went wrong earlier in the swing.
- Named faults in plain language, with a severity rating on each
- One fault marked as the root cause, chosen for what it drives rather than how bad it looks
- A 3D skeletal overlay on your own video, plus keyframe stills at each swing position
- Measured values for club path, tempo, weight shift, X-factor and pressure shift
- Drills pulled from the drill library and matched to what was found
The whole thing is capped by your footage. Blurry, shaky or badly framed video degrades joint tracking before any of the clever parts run, and a fault the models cannot see is a fault you will not get told about.
How to record a swing the analyzer can read
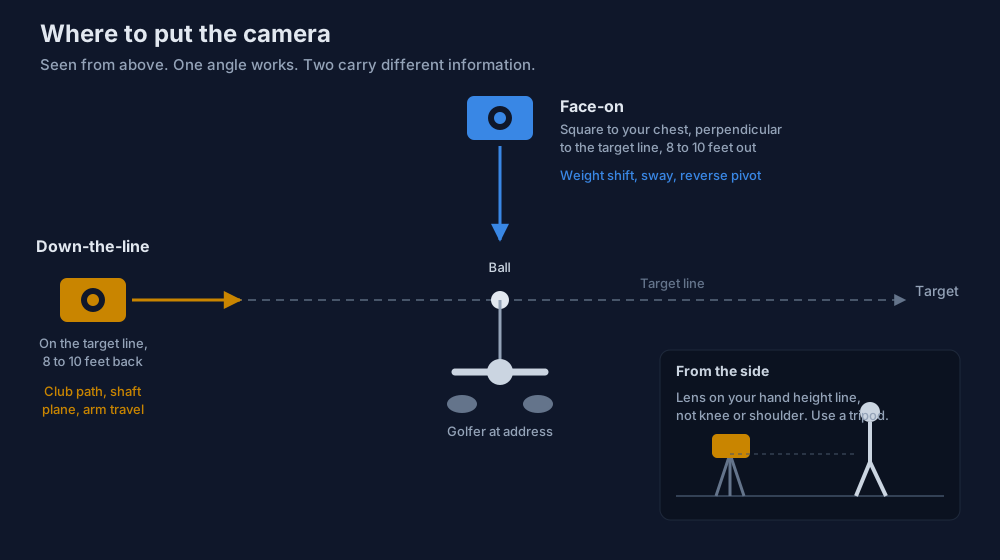
One clip works. Two clips work better, for a specific reason rather than a general one: the angles carry different information. Weight shift, sway and reverse pivot are read from the face-on view. Club path, shaft plane and how the arms travel through impact come from down-the-line. Upload one and you get one half of that picture, which is still a useful half.
Camera settings that matter
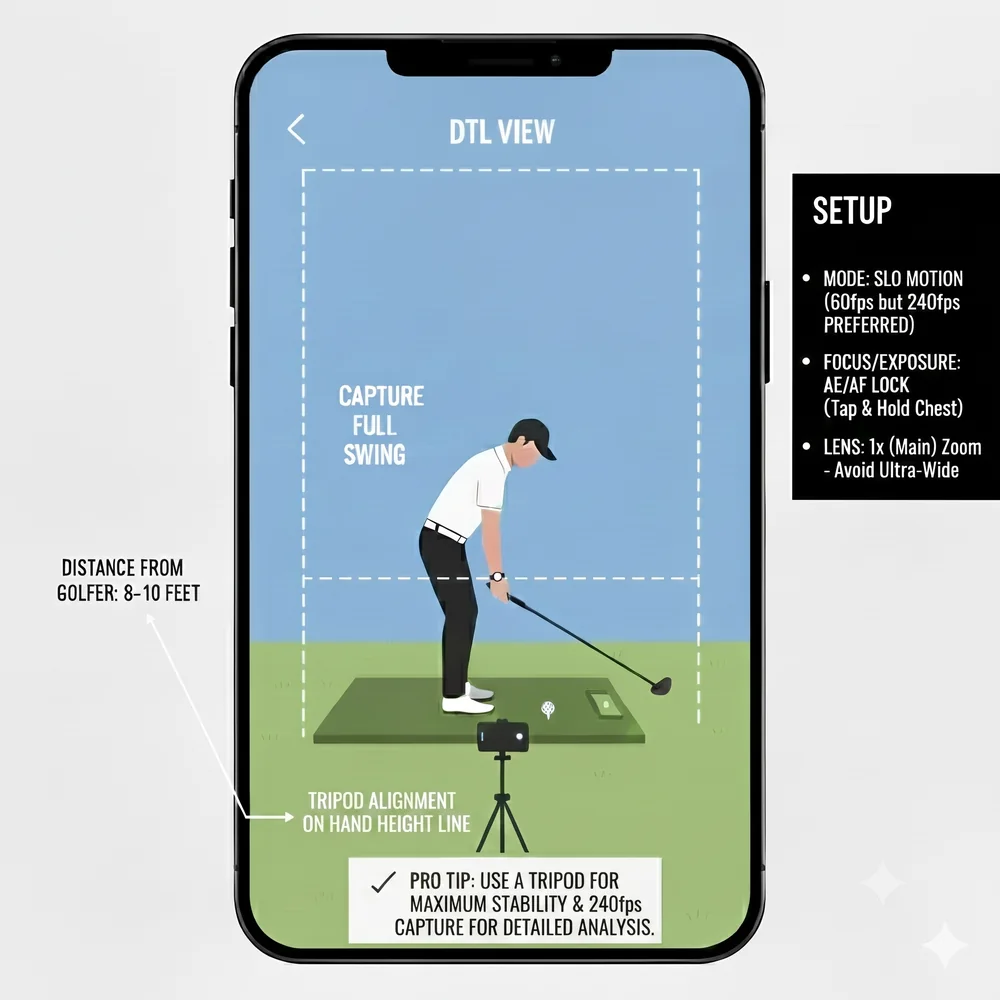
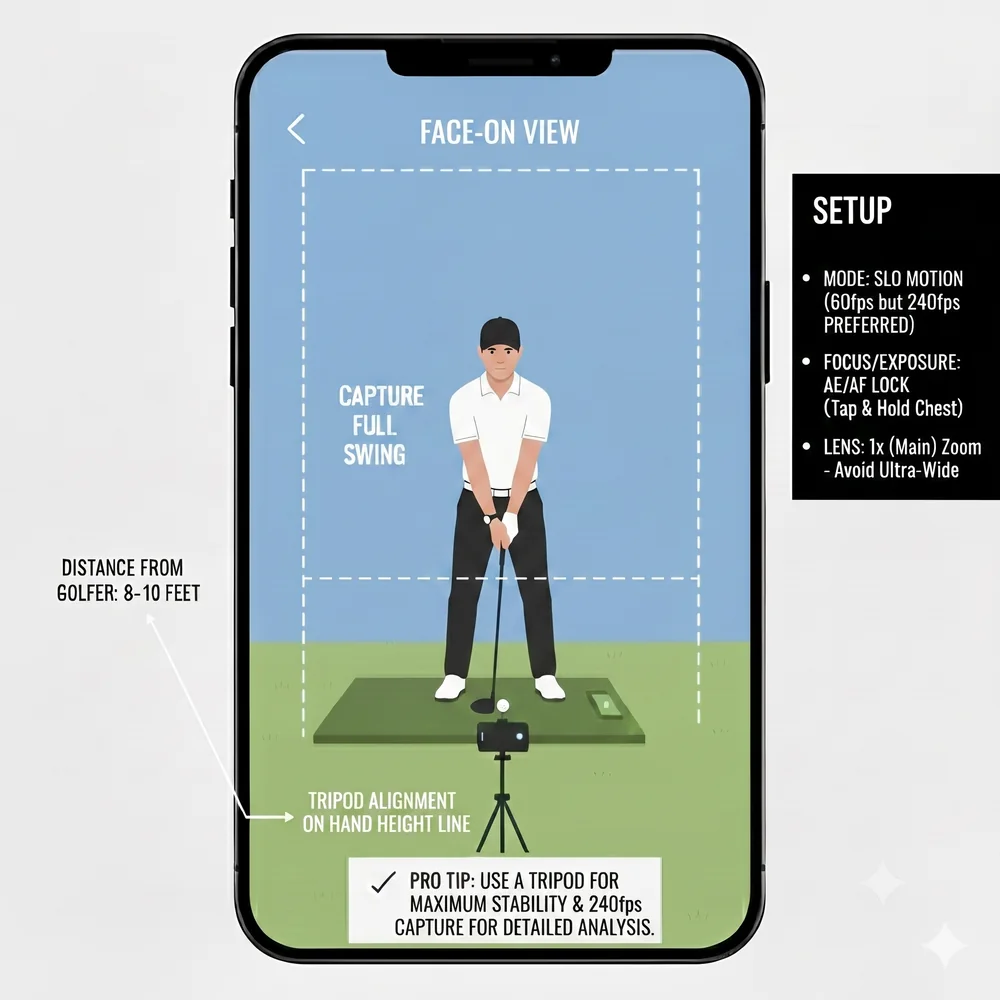
- Slow motion. 60 fps is the floor and 240 fps is better, because the transition is over in a handful of frames at normal speed.
- Lock focus and exposure before you swing. Tap and hold on your chest until the lock engages, so the camera does not hunt mid-swing.
- Use the 1x main lens. Ultra-wide bends straight lines near the edges of the frame, which is where your club spends most of the swing.
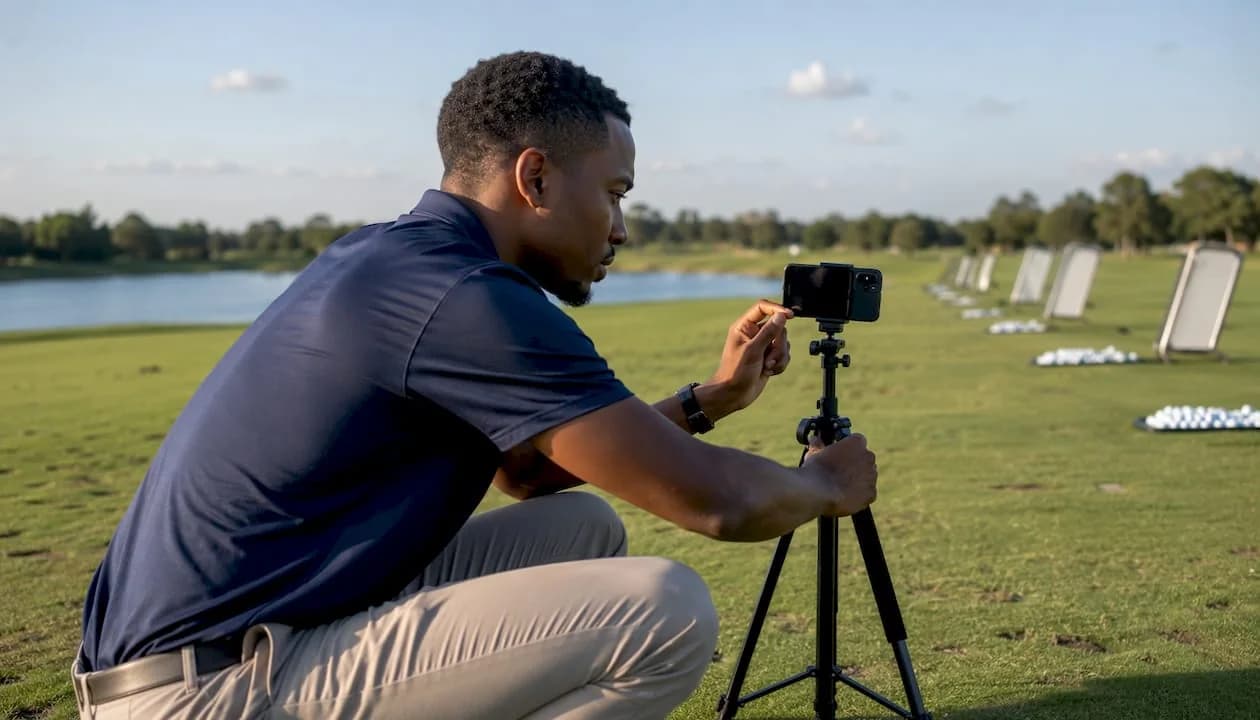
- A tripod. Even steady hands introduce enough micro-movement to blur tracking at the moment the club changes direction.
- A solid-color shirt fitted enough to show your shoulder line, a plain background, and the sun anywhere other than behind the camera.
Where to put the camera
- 1
Down-the-line
Stand the tripod 8 to 10 feet behind you on the target line, with the lens on your hand height line rather than at waist or shoulder. Your whole body and the full arc of the club should stay in frame from address to finish. This is the angle that shows swing plane, arm path and shaft lean at impact.
- 2
Face-on
Same distance, 8 to 10 feet, square to your chest and perpendicular to the target line, lens again on the hand height line. This is the angle that shows weight shift, head stability, whether your hips slide or turn, and spine tilt through impact.
What ruins a clip
- Handheld footage. The transition is the fastest part of the swing and the least forgiving of camera shake.
- Camera at knee or shoulder height instead of on your hand height line, which distorts every angle measured from that view.
- Standing closer than 8 feet, so the club leaves the frame, or further than 10, so joint detail disappears.
- Backlighting. Sun behind the golfer turns your body into a silhouette and kills landmark detection.
What the report measures
The analysis pins your swing to named positions, the same P-system coaches use, and reads each one.
| Swing position | What gets read |
|---|---|
| Address (P1) | Posture, spine angle, ball position, grip rotation, shaft angle, weight distribution |
| Takeaway (P1 to P2) | Club path off the ball, how far the shaft has moved off the address plane |
| Backswing (P2 to P3) | Shoulder and hip turn, arm structure, whether your height changed |
| Top of the backswing (P4) | Shoulder turn, hip turn, whether the shaft is across the line or laid off, lead arm and trail elbow structure |
| Transition (P4 to P5) | Sequence order, whether the club steepens or shallows, trail shoulder drop |
| Delivery (P5 to P6) | Club path angle, whether the hands are stuck behind the body, shaft steepening |
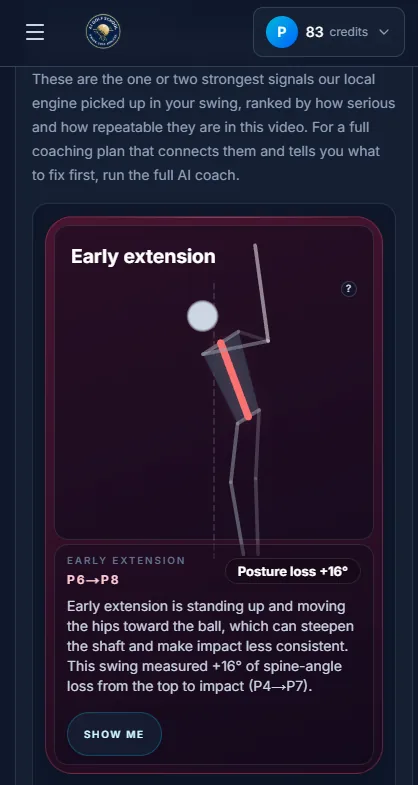
| Impact (P7) | Shaft lean, hip shift in inches, arm radius against address, early extension, flip or compression |
| Finish | Balance and whether the body completed its turn |
Impact is the only frame that decides what the ball does. Every other position gets graded on whether it helped or hurt that frame, which is why an odd-looking top of the backswing that your downswing consistently matches is usually left alone rather than written up as a fault. A quirk you have organized your swing around is not the same thing as a problem.
Faults you will see named
- Over the top, where the club drops onto the wrong line in transition
- Standing up through impact, more commonly called early extension
- Early release of the wrists, also called casting
- Hands flipping the club at impact
- Arms trapped behind the body coming down
- Reverse pivot, where your weight stays forward on the way back
- Club crossed the line or laid off at the top
- Sway off the ball in the backswing
Start from the miss you already know about
If you can name your miss without a report, the fault-fix guides cover the root causes and the drills for each one.
Thresholds move with the club and the player. A beginner with a driver might turn 30 degrees at the top where a scratch player turns past 90, and a 7-iron and a driver produce different shaft-lean numbers at impact by design. A severity score that ignores those differences is just a number generator.
Turning the report into a practice plan
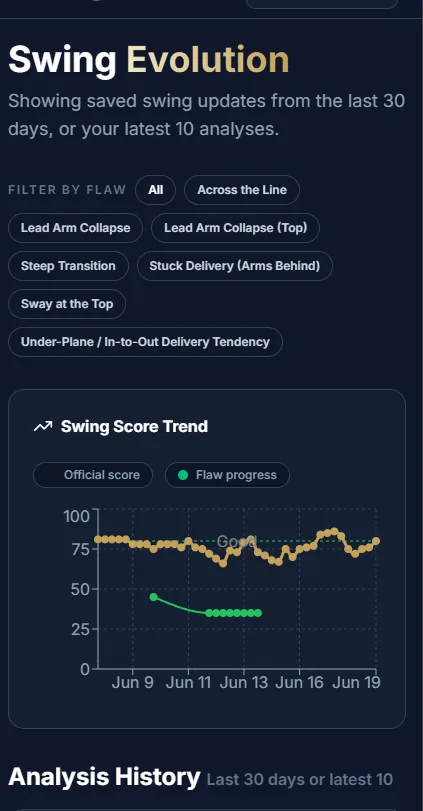
Find the single highest-impact fault and work on that one. Fixing several at once is how golfers spend six months on the range and play the same golf in October that they played in April.
- 1
Confirm the fault with your own eyes
Open the keyframe where the report flagged the breakdown and step through it slowly. You need to see the thing, not just read about it, because a fault you have not seen is a fault you cannot feel.
- 2
Pick one drill, matched to the cause
A late hip lead in the downswing wants a sequencing drill. Sway or slide wants a weight-shift drill. Weak shaft lean at impact wants a compression drill. Matching the drill to the symptom instead of the cause is the most common way this goes wrong.
- 3
Set criteria you can actually check
Not twenty minutes on hip rotation. Thirty slow-motion reps where you feel the hips lead before the arms drop, then ten at full speed, then refilm.
- 4
Retest on the same angle
Film the same view you filmed before and compare the severity on the fault you targeted. If it moved, the drill is working. If it did not, either the drill is wrong or you are not executing it the way you think you are.
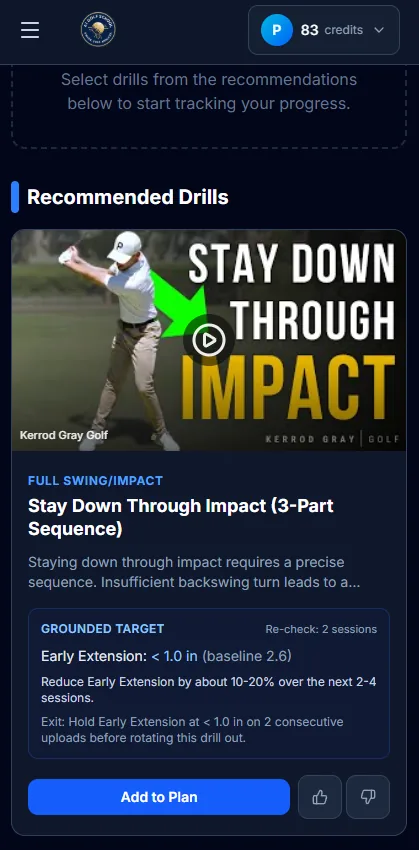
Four drills for four common root causes
These come from the same library of 140 instructor-sourced drills the analysis pulls from when it builds a practice plan.



- Log the date, the club, and the severity on your target fault after every session
- Compare video side by side, before and after, so you see the change and not just the score
- Give one fault two to three weeks of focused work before you judge it
- Move to the next fault only when the first one holds across several sessions
Free versus paid, and how long it takes
Free tools give you quick checkpoint flags. Paid ones add measured metrics, a prioritized plan, and history you can compare against. The gap that matters is diagnostic depth, and it is easy to test on a trial.
| Analysis mode | Turnaround | What you get |
|---|---|---|
| Live, on-device | Instant | A basic overlay while you swing, useful for immediate feel |
| Automated cloud analysis | Minutes | Full measurements, named faults with severity, matched drills |
| Human coach review | Hours to days | A person's interpretation and personal coaching notes |
AI Golf School sits in the middle row. Your first analysis is free with no card, and paid plans start at $9.99 a month for golfers who want more analyses while they work through a fix.
When you test a platform on a trial, check one thing: does the report tell you why a fault is happening, or only that it is happening? A tool that says your face was open at impact has described your ball flight back to you. A tool that says your face was open because the club arrived from outside and your hands had to save it has given you something to practice.
Choosing an analyzer
- Does it run on the device you already own?
- Does it accept the angle you can realistically film, and does a second angle add anything?
- Does it report sequence, shaft lean, club path and rotation, or only generic checkpoint flags?
- Are drills built in and tied to your specific faults, or do you go hunting for them yourself?
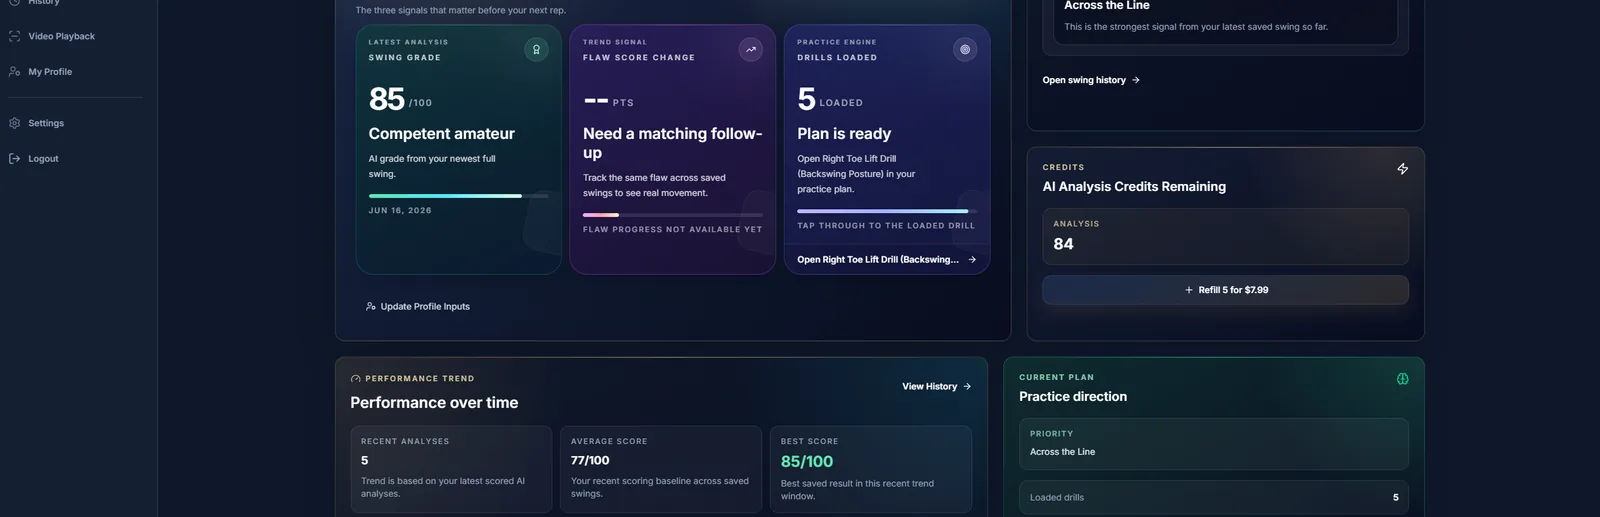
- Can you compare one analysis against the last one, so progress is visible?
- Is there a free tier or trial deep enough to judge the diagnosis, not just the interface?
Then two questions about you rather than the software. Are you after a one-off diagnosis or a season of tracked progress? And do you want the drills handed to you, or are you happy sourcing your own once you know the fault? The answers narrow the field fast.
The root-cause protocol
- 1
Record a baseline
Film before you change anything. A baseline you took after two weeks of fiddling is not a baseline.
- 2
Run the analysis
Get severity scores across the swing positions and note which fault is marked as the primary cause.
- 3
Take the root cause, not the loudest score
The fault worth starting on is the one with the most downstream consequences, which is often not the one with the highest number.
- 4
Prescribe one drill
Match it to the cause using the drill library or the fault-fix guide for that fault.
- 5
Practice against a rep count
Set the reps, the tempo, and the point at which you will refilm. Vague practice produces vague results.
- 6
Retest
Same angle, same club, and compare the severity on the fault you targeted.
- 7
Iterate
If severity dropped, move on. If it did not, change the drill or check that you are doing it correctly before you conclude the diagnosis was wrong.
What that looks like on an over-the-top swing
Take a common pattern. The report flags over the top in transition at high severity, an open face at impact, and a ball that starts left and curves right. Three findings, one cause. The face is not the thing to fix, because the face is reacting to a club that arrived from outside and hands that had to rescue it late. So the drill goes on the transition, and the downswing sequence drill is a reasonable place to start.
Two weeks later you refilm and check the transition severity. If the face flag softens without you ever working on the face, that is the tell that you fixed the right thing. That downstream movement is the actual evidence, and it is the reason the root-cause ordering is worth taking seriously instead of treating the report as a to-do list.
Why one root cause beats a list of fixes
Conventional golf instruction hands you a list. Fix the grip, fix the takeaway, fix the hip turn. The problem is that your nervous system does not improve by committee. Split your attention across three mechanical changes and none of them gets the repetition volume required to become automatic, so you end the season with three half-built moves instead of one finished one.
The root-cause approach cuts that list to one, and not because the other faults are imaginary. Most secondary faults are downstream effects of a single upstream breakdown. Fix the sequence and the casting often goes with it. Fix the weight shift and the early extension frequently follows. The severity ranking in a report is closer to a map of cause and effect than a priority list.
There is a less technical argument too. Golfers who can see one number move stay motivated enough to keep filming. A measurable drop in severity on the fault you targeted is more persuasive than a vague sense that the ball is flying better, and that feedback loop is what turns a one-time swing check into something you actually keep doing.
Where AI Golf School fits
Most golfers who want to analyze their swing end up with a fragmented process: film on one app, read some generic feedback, hunt for drills somewhere else, and never find out whether any of it worked.
Upload one clip and the physics engine reads your swing frame by frame across every position, scores the faults it finds, names the one driving the rest, and maps it to drills from a library of 140 organized by swing fault. Analyses are stored, so the next one can be compared against the last. Your first is free.
Key takeaways
| Point | Details |
|---|---|
| One angle is enough to start | Down-the-line or face-on both work. Two clips add measurements rather than unlocking the basics, because each angle carries different information. |
| Footage quality caps report quality | Waist-height camera, stable mount, plain background, good light. Pose estimation cannot report on joints it could not find. |
| Fix the root cause, not the loudest score | The primary cause is chosen for what it drives downstream, which is often not the fault with the highest severity number. |
| Retest to verify, not to feel | Refilm the same angle after a focused block and compare severity on the fault you targeted. Downstream flags softening on their own is the strongest signal you picked the right cause. |
| One drill at a time | Three simultaneous mechanical changes means none of them gets enough repetitions to stick. |
Frequently asked questions
Do I need two camera angles for AI swing analysis?
No. One clip is enough, from either down-the-line or face-on. Two angles add measurements rather than enabling the basics, because each view carries different information: weight shift, sway and reverse pivot come from face-on, while club path, shaft plane and arm travel come from down-the-line.
How accurate is AI golf swing analysis?
Accuracy depends on the footage and on whether the tool measures or guesses. AI Golf School fuses six computer-vision models per swing and runs the tracking through a physics engine before any coaching language is generated, so the read is anchored to measured mechanics rather than a model's impression of a still frame. Poor lighting, camera shake and bad framing degrade the tracking and therefore the report.
How long does an AI swing analysis take?
A few minutes for automated cloud analysis. Live on-device feedback is instant but shallower, and human coach review runs hours to days depending on the coach.
Is there a free AI golf swing analyzer?
Your first full analysis on AI Golf School is free with no card required. Paid plans start at $9.99 a month for golfers who want more analyses while they work through a fix.
What should I practice after getting my report?
One drill, tied to the fault the report named as the primary cause. Set a rep count and a point at which you will refilm, then compare the severity on that fault. Leave the secondary faults alone until the first one holds across several sessions.
How AI Golf School Diagnoses Your Swing
Instead of a vague list of swing tips, every analysis isolates your single root-cause fault, tracks 33 skeletal joints in 3D through impact, and pairs you with a focused drill plan.
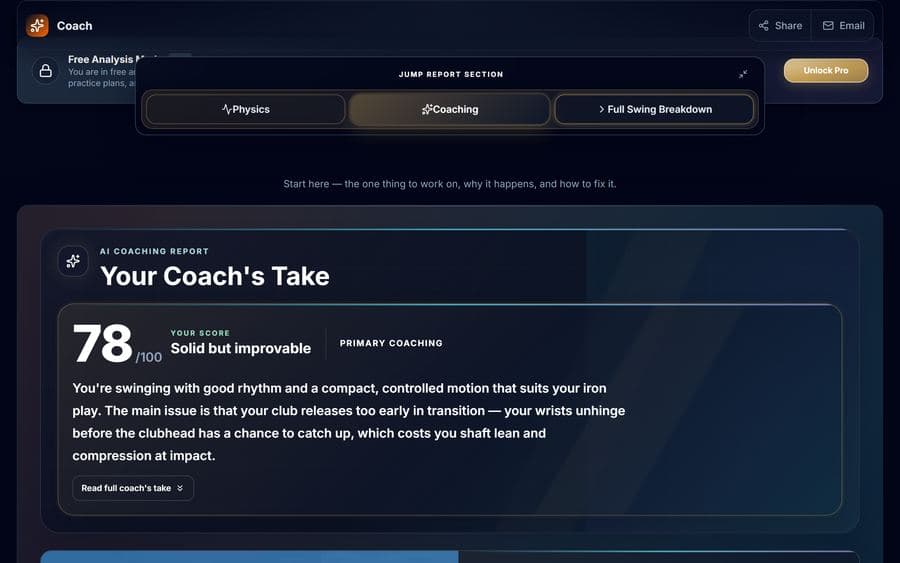
Composite score with root-cause flaw detection and severity ratings.
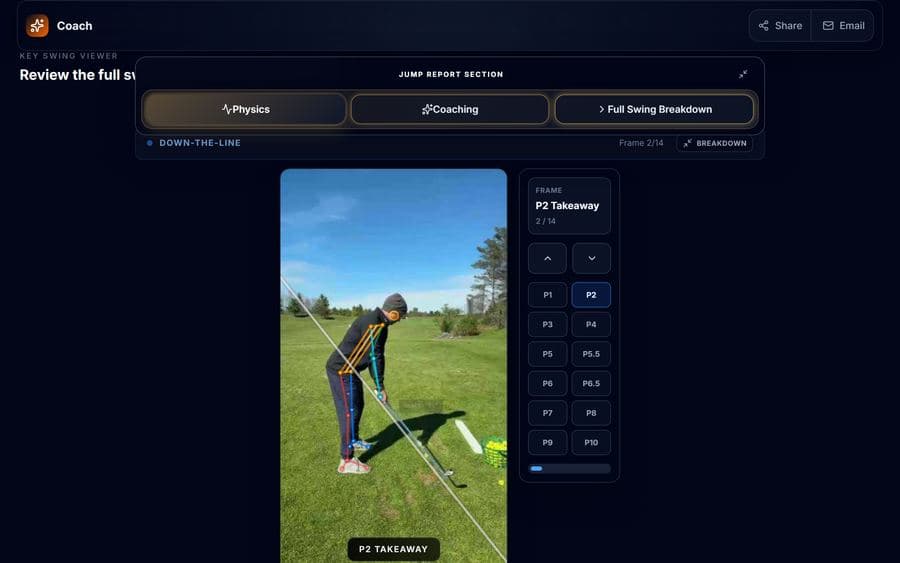
The Oracle physics engine tracks 33 joints across all swing phases.
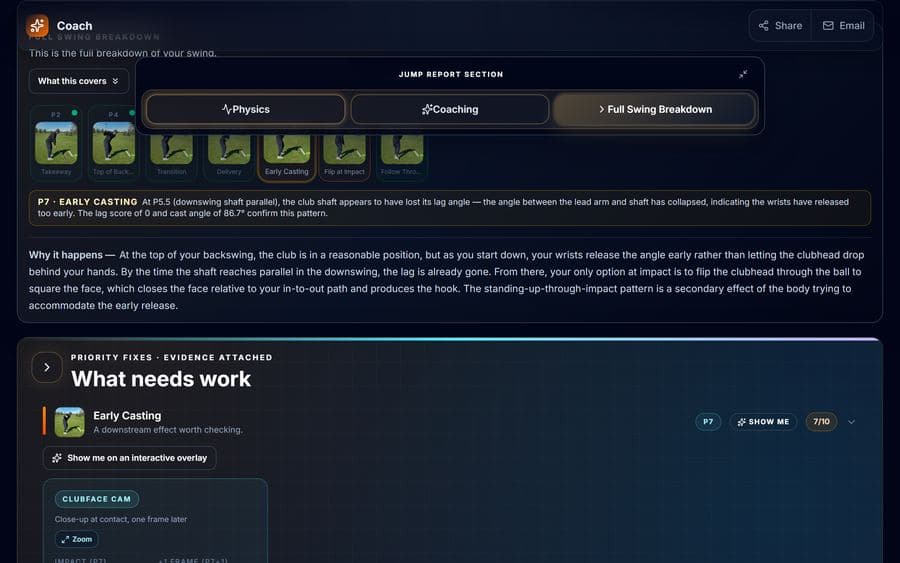
Personalized drills from certified coaches matched to your specific flaws.
Upload one video from your phone to diagnose your swing mechanics.